 |
|
| Site Areas |
store | | | articles | | | forums | | | studios | | | vacations |
| yoga | massage | fitness | wellness | readings | ask the expert | |
Triang Mukhaikapada Paschimottanasana: a Restorative Seated Forward BendYogiSource.com Staff©Yoga People, LLC 2017 Pronunciation: tree-AWN-guh moo-KA-eh-ka-paw-duh , POSH-ee -moh tun AWS ah-nah
Thus it can be called "three parts (buttocks, knees and feet) and face over one foot intense western or back stretch." A simple name in English is the One Leg Folded-Back Pose. Triang Mukhaikapada Paschimottanasana is a seated forward bend similar to Paschimottanasana or Janu Sirsasana. In some ways, it is a beginner pose because it is easier to reach the forward foot than in many other seated forward bends. In other ways it is confounding by the challenge of asymmetry and balance. The challenge can be mitigated by sitting on a support under the buttock of the folded leg so that the hips are level which we will explain in more detail. Preparation: We suggest that you sit for a few moments in Virasana as a preparation for Triang Mukhaikapada Paschimottanasana. Work on getting the calf skin pulled away from the thighs. Notice how the legs work in Virasana as you sit. Another good preparation pose is include Ardha Baddha Padma Paschimottanasana (Half-bound Lotus Forward Bend) which also opens the hips but in a different way. Yoga.com will feature this pose soon, in the Yoga Article. Do Ardha Baddha Padma Paschimottanasana pose when you do a forward bend practice with is very restorative, especially if you hold the poses a few minutes each and on each side. Paschimottanasana and Janu Sirsasana are also good preparation for Triang Mukhaikapada Paschimottanasana.
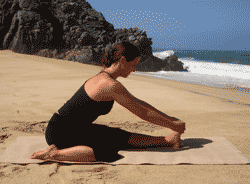
Technique: Sit on your mat with blankets, a block and a strap nearby. Sit with legs extended straight in front of you and together in Dandasana. The first step is to bend the right leg of back into the Virasana position. This brings the right foot besides the right hip. The leg is bent, and your foot is facing behind you. Your weight is on your knee and the top. If your foot is uncomfortable because of the mat being too thin, spread out a blanket on the mat, and then try the pose. If the bent leg's knee causes pain see if the pain is relieved by inserting a tightly rolled washcloth so that it is lodged close to the inner knee between the thigh and calf of the bent leg. This stops the inner knee from fully closing and will relieve certain types of knee pain. You should experiment with differing thicknesses of rolled material to attempt to find one that relieves your pain. Lift up a few inches from your seat for a moment and then sit down again while holding your right calf with your right hand and rolling it to the outside as you lower your right sit bone to or towards the floor. Simultaneously roll the right upper thigh inwards. These two movements help align your knee-cap (patella bone) and minimize or avoid an unhealthy asymmetry in the delicate knee joint. Bring your knees towards each other. When you are sitting you may find that the bent leg's hip and sit-bone are higher than the straight leg's hip and sit-bone. The side with the extended leg may sink down to the floor while your bent leg's buttock lifts up. If this occurs in your pose, use one or more props to create height and support under the straight leg's sit-bone. People differ widely in the amount of additional height that they need under the straight leg's sit-bone to bring it to the same height as the bent leg side. The height of your prop should make the height of the hips and also the sit bones equal. Some people are so flexible that both sit bones are on the floor and they don't need any additional height. Some may only need a folded washcloth or a single folded blanket under the buttock. Others need to construct a much higher prop using a yoga block, a bolster, a group of folded blankets or some combination. Place your prop under the straight leg's sit-bone and not under the thigh. You are likely to find that you need a differing height when you do the pose with the right leg bent in the Virasana position than you need when you do the pose with the left leg bent in the Virasana position. Whatever height your body needs it is important to use it as it will make the pose aligned and much healthier for your body. Once you are happily balanced with your hipbones and sit bones equal distances from the floor, reach back and pull the buttock flesh backwards so the sit bones sink more. Make sure you are still sitting with equal weight on each of your sit bones. Press into your sit bones. Press your extended leg down into the floor. Find the balance in this position. BKS Iyengar suggests that you throw the weight of the body on the bent knee. Before reaching for your foot try to align your navel directly over the line between your upper legs come together. Throughout the pose keep the straight leg and foot active. Point the toes of the straight leg's foot towards the sky. Keep your spine extended with the normal tadasana spinal curves and bend at the waist. Keep the spine aligned over the line formed between your upper legs. On an exhalation extend the torso over the legs. Extend forward and descend the torso towards the legs as far as you can without rounding the spine. Inhale and then, on an exhalation, reach and grasp your left foot. If you can not yet reach the foot, hold onto a yoga belt that you loop around the foot. Grip the sides of the sole (or hold onto the yoga strap). Extend the trunk forward. If you can, hold the wrist of the arm of the bent leg side with the hand of your straight leg side beyond the straight leg's foot. Minimizing any convex rounding of your spine extend and tilt your head slightly back. Beryl Bender Birch reminds us that your heart should be open which means no hunched shoulders or closing of the chest. Keep your elbows up and your arms straight. Gaze at the toes. As you exhale, continue to stretch and lower yourself towards your left leg. Lean forward with open hips with knees together. Continue bringing the navel towards the extended foot. Do not round the spine and slump over. Of course, the spine is slightly rounded when you reach your leg. Keep working the pose from the hips and the hamstring muscles of the straight leg. Avoid too much rounding in your spine as you bring the torso down. Go slowly as you come down. Come down keeping the spine as extended as possible. Elongate both sides of your chest and waist equally. Keep your abdomen soft and relaxed without tension throughout the pose. As you descend over the outstretched leg keep your back level. You may have a tendency to tilt the back toward the straight leg. Don't let this happen.
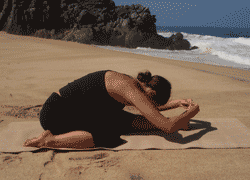
Bend your arms and widen your elbows as you descend. When you reach your current maximum stretch, rest your head on your straight leg shin as close to your top foot as possible. If your head does not yet reach your shins, place a round bolster or pillow on your shin and use the prop to support your head. Stay in the pose for at least 5 long breaths. If you are doing restorative yoga, try timing yourself for 1-5 minutes on each side. When you come out of the pose, release your hands or belt. Use your hands to slowly push your torso back up to a sitting position as you inhale. Release the bent leg and straighten it next to the other so that you are seated in Dandasana. Now repeat the pose on the opposite side of the body, bending the right leg this time. Beginner's tip: If there is strain in the bent knee, sit on a higher mountain made of blankets or a block, or a folded towel or a combination. The goal is the have level hip bone points in front of the body, and the sit bones at an equal height. The folded leg brings that side higher until you get really flexible and both sit bones are on the floor.
Combine this pose with other restorative forward bends like Janu Sirsasana, Baddha Konasana, Parivrtta Janu Sirsasana, Ardha Baddha Padma Paschimottanasana, Upavistha Konasana and Paschimottanasana. Breathing: Inhale from whatever pose you were doing as you make a Virasana leg and extend the other leg in front of you. Extend spine out of pelvis and reach forward to hold your foot or belt foot while you still inhaling prior to starting to descend towards your outstretched leg.. Exhale as you bend forward for 5 or more breaths. Inhale coming up and as you replace the bent leg in front of you and resume Dandasana. Ashtanga yogis focus on breath and on gazing at a point, such as the toes, in this posture. Ashtanga practice links poses together smoothly in a vinyasa, connecting them by breath. Props are not used very much in Ashtanga yoga. Restorative yoga is therapeutic and calls for doing poses for longer, one at a time, yet utilizes the same breathing. So when you are closing the torso, exhale and when you open the torso, simply inhale. Restorative yoga calls for a bolster and/or other props to make the pose more relaxing so you can hold it for awhile and allow gravity and your own weight to stretch our your leg and spinal muscles. You can also do the pose with props in an Iyengar yoga practice and work toward having your torso extend on top of your leg. No matter which way you do it, it is likely to be good for you!
It is a restorative seated forward bend which can be done for menstruation, illness, AIDS, recovery from travel, for those who cannot do inversions, and for fatigue. A forward bending practice is nice before bed or in the middle of the night when you cannot sleep. Additional benefits are to calm the mind and to open the hips plus making the spine more flexible.
All rights reserved copryright Yoga People LLC 2007
|
| about us | contact | privacy | site map | careers | |

|
|

