 |
|
| Site Areas |
store | | | articles | | | forums | | | studios | | | vacations |
| yoga | massage | fitness | wellness | readings | ask the expert | |
ParsvottanasanaYogiSource.com Staff©Yoga People, LLC 2017 Pronunciation: (pars-VOH-tahn-AS-ahna)
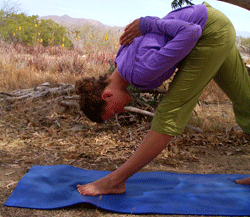
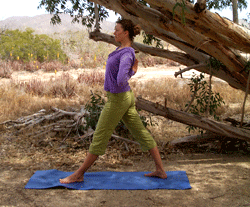
Technique: Start in Tadasana, mountain pose, with your feet together. Raise your kneecaps and keep firm quadriceps and straight legs. Arms: Extend your arms out to the sides parallel to the floor. Extend the arms maximally so that your scapulae (shoulder blades) move away from the spine. If you can, position the hands palms together fingertips facing upwards on your back as high up the spine as possible. This brings your hands to the Indian ďNamaste" salutation behind the body. Work from your scapulae as you bring your arms into this position. Keep the upper scapulae as far away from the spine as possible as the lower scapulae move in towards the spine. Feel the rotation of the scapulae as the arms move into the Namaste position. If you do not, as yet, have sufficient flexibility to bring your hands together behind your spine then grasp opposite elbows behind your back. An important function of the arms in this pose is to help open the upper chest. This opening is encouraged by pressing your outer elbows down and towards each other. Keep the chest as open as possible throughout the pose. Legs: Step or jump your feet a legís length apart. Stand as you would in Trikonasana, with your right foot turned 90 degrees out to the right and your rear left foot turned in. However in this pose the rear foot is turned in more deeply. In Trikonasana the rear foot turns in about 30 degrees while in Parsvottanasana it turns in about twice as far to 60 degrees. This deeper angle in the rear foot allows the pelvis to rotate further in the pose. Eventually the pelvis should rotate until it is facing the forward foot. Hips: Now swivel your hips to face the right forward foot. Make the hips square facing directly forward with both side hips at the same height. It is a common mistake to have one hip higher than the other in this pose. Torso: Lengthen your spine and both sides of your torso. Do a mild back arch lifting your ribs up from the pelvis and raising the sternum towards the sky. Arch (donít fold) the neck backwards. Be sure not to crunch you neck, keeping it long. Swivel the hips. Bring the hip of the rear leg forward and the hip of the front leg backward. Roll the outer rear leg forward and the inner rear leg backward and bring the upper inner legs towards each other. These movements help rotate the pelvis so that it is aligned facing directly forward. The goal is for the spine to be aligned over the forward leg as you fold forward in the next phase of the pose.
Coming Forward: Bend at the waist and lower your extended spine without allowing your back to round. If possible, descend until your trunk is parallel with the floor. If you cannot come parallel to the floor without rounding the back descend a far as possible with an extended straight spine. As you come forward keep adjusting your hips to maintain their alignment. Keep the spine over the midline of your front leg as much as possible. The ability to descend with a straight spine comes from extension in your legs. Keep the spine extended and the length on each side equal as you descend over the forward leg. Stay in this position for a few breaths. Allowing any necessary rounding of the spine, descend the torso to the leg. Place your chest on the midline of your front thigh. Extend the torso forward and down along the forward leg. Remove or minimize any rounding of the spine. Keep the side hip bones aligned and parallel. Stay for a few breaths in the pose so you can experience the calming aspects of this posture. Keep the arms positioned in ďreversed NamasteĒ raise the torso back to an upright position while keeping your hips facing the forward leg. Rotate the pelvis to the front and bring the feet back to a forward facing parallel position. Take a moment to find your center and then repeat the posture on the left side. Beginners Tip: If you are feeling unstable in this posture, press down with the forward big toe mound, the inner edge of that front foot and the outside of the rear foot. Most students go too far and too fast. This means that they experience pain and donít feel the soothing benefits of the posture. Hamstrings need to be stretched delicately and slowly along with other muscles. Variation: If it hurts to put the hands into the "reverse Namaste" position (palms together, in prayer posture), and you donít want to hold opposite elbows as explained above, try something else. Simple put the palms together but point the fingers down instead of up. Those with wrist issues are more likely to find that way comfortable. Benefits: Soothing to the nervous system Increases flexibility of the neck, shoulders, elbows and wrists and may help those with arthritis. Improves digestion; May reduces menstrual pain; The legs, hips and torso get intense stretching Chest and heart opening pose Hip opener Hamstring lengthener Shoulder opener Calming to mind, body, and spirit Cautions: Don't do this pose if you have an injury to the hips, back or shoulders or have high blood pressure or currently are experiencing dysentery or diarrhea. Donít do it if you have an abdominal hernia or some sort of heart condition Make sure you do not overarch the neck Those with carpal tunnel syndrome should be cautious of placing the hands in prayer position behind the back. Listen to your body and donít overstretch the wrists. Additionally, if you have sciatica or hamstring injuries be extra cautious and go slowly, stopping before it hurts. Thanks to Iyengar teacher Victor Oppenheimer for editing of this article. Copyright Yoga.com
|
| about us | contact | privacy | site map | careers | |

|
|

