 |
|
| Site Areas |
store | | | articles | | | forums | | | studios | | | vacations |
| yoga | massage | fitness | wellness | readings | ask the expert | |
Gomukhasana: The Cow Face PoseYogiSource.com Staff©Yoga People, LLC 2017 
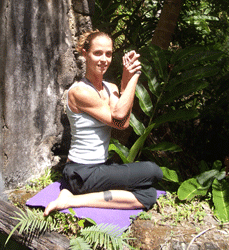
Pronunciation: go-moo-KAWS-ahna Translation: Go means cow in Sanskrit. Mukha is “face” and asana is “pose”. Thus, Gomukhasana is also called Cow Face Pose. Some say that the crossed legs look like lips, and the elbows are the “ears” of the cow. You must have imagination to see this cow face. This is a hip opener, a seated pose, and can be restorative to the practitioner. It is important to listen to the body and only go as deep is as comfortable. Holding for a long time opens the hips and shoulders further and brings one into an inward state of being. Technique: Sit with the legs stretched out in front of you. Place the bent left knee on top of the bent right knee. You feet go on the outside of the hips, as close as possible to them, resting on the floor, not under your body. Use your hand to pull them in as your knees are stacked neatly on top of one another. You may need to sit on a block to raise the level of your sit bones. Sit evenly on the sitting bones. Next, extend your spine and lift your sternum as you prepare to put the arms in position. You can use a strap if your hands don’t reach each other. Start by raising the top arm first. You can use your opposite arm to roll the upper arm inward. Your arm is bent and you bring the right elbow up. To know which arm to bring up, look at your legs. The leg on the bottom is the side that arm that goes elbow up is on. Now bend the lower arm and reach behind you. That elbow goes down at the same time as the other elbow is up. The back of your hand touches your back. Now reach around your back and pull your lower elbow inward and upward with your upper hand to help creep your rear hand further up your back. Then return your upper arm to its original position of straight upward. The upper arm is palm toward back. The lower arm is palm facing out. Try to clasp your hands if possible. If not, dangle a strap or towel from the top hand and grasp it with the lower hand. Inch your hands closer together on the towel or strap. Eventually you may be able to clasp the hands together. Work on sitting tall, keeping the back as straight as possible, with a lifted sternum. Try pressing your head against your arms to work deeper into the shoulders. The upper arm side of the torso tends to lengthen more than the lower arm side. The lower arm side will collapse. Try to avoid this be keeping an equal length on each side of the body. . Don’t let your belly to push forward. Lengthen and extend the upper arm side of your torso while the lower arm side of your torso broadens. Hold the pose for three to five minutes per side. Release the arms then the legs. Reverse the pose so that the left leg and knee is on the bottom while the left elbow is raised to the sky. Beginner’s Tips: If your shoulders are tight or extension isn’t enough to clasp the hands, try a towel or a strap as suggested. Some people can clasp their hands on one side, yet when they reverse their hands, they need a strap or towel in between to bridge the gap.
Variations: Another variation is to put your arms in front of you twisted as they are in Garudasana, the standing eagle posture. Stretch the arms straight forward and parallel to floor. Open the back with wide shoulder blades. Now cross the arms in front of you so that the right arm is over the left. Now bend your elbows and place one elbow in the crook of the other. Raise the elbow level as you raise the forearms. There is a right angle between the forearms and the upper arms. Press the palms so the face each other and meet as best they can. Thumbs go together, or as close as possible as one hand will be lower. Thumbs face you which may mean that your rotate your hands a bit. As you raise your elbows again, extend your fingers upward. Benefits: This posture combined with the hamstring and glut stretches will help, over time, to relieve most of the chronic type pain that runners feel in their knees. Move cautiously with deep listening to protect your knees from strain. Hip joints open tremendously. This is where stuck energy in the body is stored and the pose helps release that energy. The lower spine is affected and decompresses in the process of the folding forward variation. Cautions and Contra-indications: If sciatica or lower back problems exist, do not fold forward; Don’t do the pose if you have any serious neck or shoulder problems Pregnant women should not fold forward after the first trimester as it may put pressure on the belly and the baby. If there are knee issues or pain, try keeping the lower leg straight. If that is still too difficult, sit cross-legged and fold forward.
All Rights Reserved |
| about us | contact | privacy | site map | careers | |

|
|
